



Solar Astronomy 101

Figure 1 - Sun in White Light and Calcium-K, Eduardo Schaberger Poupeau
1. Introduction
As of June 21, the summer solstice, the Northern Hemisphere will officially have entered its summer season. This time of the year is typically highlighted by long sunny days, with June 21 actually having the longest daylight period of the entire year. For many astrophotographers, this unfortunately also represents less total darkness at night for imaging deep sky objects. While many find the summer months to be less than ideal for nighttime imaging, the long days of sunlight serve as a friendly reminder of the most readily available astronomy target in the skies, our own Sun!
Solar astrophotography has become increasingly popular in recent years thanks to the increased availability and affordability of solar equipment, as well as the growing ability to use nearly any optical device you want (with appropriate filters). Film and glass based solar filters can be simply slid over the front of nearly any telescope or binocular for quick and easy solar observing, while dedicated solar telescopes and internal solar filters offer solutions for high resolution imaging and stunning views of the Sun in various wavelengths. Let’s look at the various methods available to solar astronomers and see which options best suit your needs, budget, or available equipment.
2. Budget Friendly Solar Astronomy & Astrophotography
The cheapest method to enjoy solar astronomy is without a doubt the creation of a homemade solar filter. Many manufacturers have developed highly affordable and safe solar film, such as the Baader AstroSolar Solar Filter Film , which can be cut out and shaped and sized to meet your needs, while effectively blocking out 99.999% of solar light. This film will allow you to observe and image the Sun in what is referred to as “white light” and allows you to easily observe sunspots (figures 1 & 2) and other large solar activity with minimal preparation.

Figure 2 - Sunspots in White Light, Quinn Sookswat
Simply measure the front end of your telescopes optical tube or binocular optics and cut the film slightly larger, allowing for some overlap on the edges to help keep the film secured. Cardboard and tape can even be used to create a housing for the film (figure 3), which can then be easily removed and reused as you please. Check out this document outlining the method for tips on building your own solar film housing. This film can even be used to create simple solar eyeglasses for viewing solar eclipses. If you’re looking for an easy and cheap entry into solar astronomy, this is your best bet.
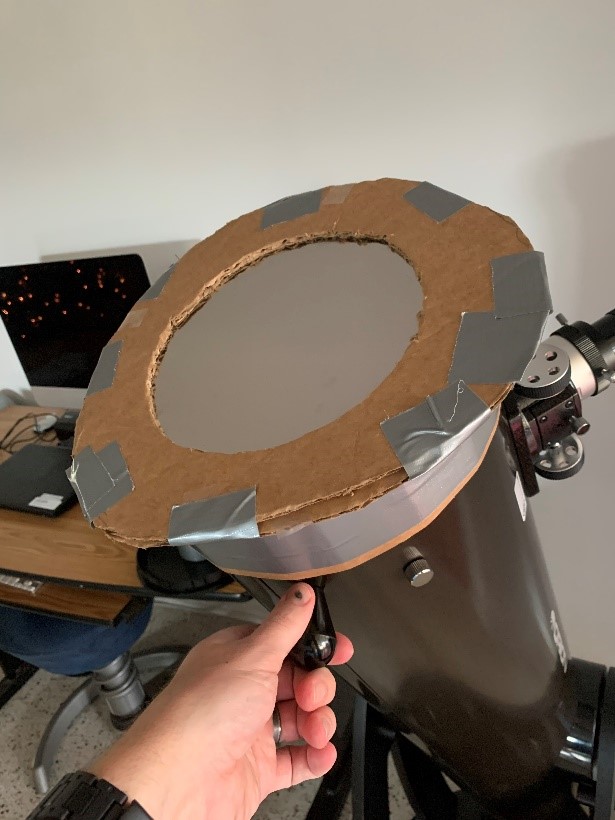
Figure 3 - Solar Film Housing, Spencer Collins
The next cheapest alternative for solar astronomy is the use of pre-manufactured glass solar filters. Similar to the concept of the homemade solar film filter, these glass filters are built to fit specific size telescope tubes or lenses to ensure a secure and safe fit. While these filters also provide a “white light” view of the Sun, you will find that these filters are more durable and offer a higher quality image than the cheaper solar film. A variety of sizes and designs are available, such as the Spectrum Telescope Glass Solar Filter (Figure 4) for telescope tubes, or the Baader AstroSolar Filter for Binoculars & Camera Lenses.

Figure 4 - Spectrum Glass Solar Filter
Affordable solar imaging can also be accomplished using a variety of Herschel wedges on refractor telescopes, such as the Antlia Imaging Herschel Wedge with Calcium-K Solar Filter (Figure 5, for imaging ONLY), or the Lunt Solar White Light Solar Wedge (Figure 6, suitable for imaging and observing with the addition of a polarizing filter). These wedges simply slide or screw into the eyepiece holder of your telescope to allow for quick solar imaging. Most importantly, be sure to read product descriptions and measure your gear (twice to be safe) to make sure you are selecting the appropriate size filter, as any gap in protection of your optical train will introduce harmful Sun exposure to you and your equipment regardless of design.

Figure 5 - Sun in Calcium-K with Antlia Herschel Wedge, Jukka Paavilainen

Figure 6 - Lunt Solar White Light Solar Wedge
3. Advanced Solar Astrophotography
Serious astrophotographers looking to image the Sun will find that while white light imaging is cheap and effective, it does not provide high resolution details of the solar surface, prominences, and flares that dedicated solar telescopes and high-quality filters can provide. One of the most popular routes for solar astrophotography is the use of an internal solar filter on a traditional telescope. The gold standard of this concept comes from the Daystar Quark (Figure 7) lineup, which are inserted into the focus tube or diagonal of a telescope and allow you to image specific wavelengths of light. Imaging in hydrogen-alpha, magnesium, sodium or calcium will allow you to capture a variety of unique solar features in tremendous detail (Figure 8). While these filters are designed with longer focal lengths in mind, excellent results can be achieved with telescopes at a range of focal lengths and optical quality. Unlike nighttime astrophotography, a simple doublet refractor is more than adequate to produce tremendous images when paired with the Quark.

Figure 7 -Daystar Quark

Figure 8 - Solar Surface w/ Daystar Quark, Amrit Prasad
If adjusting your imaging train between nighttime and solar imaging sounds inconvenient, dedicated solar telescopes provide the most convenient way to produce the highest-quality solar images and are available at a range of price points. Entry level solar astrophotographers may find a budget friendly option such as the DayStar Solar Scout 60mm Solar Telescope (Figure 9) meets their needs, and requires no additional adapters or filters thanks to its internal hydrogen-alpha solar etalon. More advanced solar astrophotographers will turn to high-end solar telescopes for truly breathtaking views. The Coronado SolarMax (Figure 10) solar telescope lineup is a perfect example of such high-end pieces of gear and are available in both single-stacked and double-stacked models of various apertures to allow for a range of price points. If you plan to center your astrophotography journey around solar imaging, a quality dedicated solar telescope will certainly give you the upper hand!

Figure 9 - Daystar Solar Scout

Figure 10 - Coronado SolarMax Telescope
Most recently, the development of modular telescopes has introduced a hybrid type of telescope which is capable of both nighttime and solar imaging with the same telescope and no need for additional filters. Lunt Solar Universal Day & Night Modular Telescopes (Figure 11) are leading the way in this format with their recently released f/7 doublet refractor with a built-in hydrogen-alpha module and pressure tuner. This design allows you to simply remove the hydrogen-alpha module at the end of your solar sessions to be prepared for dark skies! Modular telescopes are an excellent middle-ground for anyone looking to dip their toes into both solar and nighttime astrophotography.

Figure 11 - Lunt Modular Day & Night Telescope
Solar astronomy is an incredibly rewarding specialty within hobby astronomy, allowing the average person to get a better view of our parent star than ever before. With safety at the forefront, solar astronomy is sure to spark a love for astronomy in those new to the hobby and rekindle the appreciation of our nuclear neighbor for those that have taken it for granted.
- For more solar astronomy equipment, visit us here.
- To read a more in-depth guide on the Sun, solar observing and related observing equipment, you can view our solar guide at this link (https://agenaastro.com/articles/observing-the-sun).
*Follow us on Facebook and Instagram to stay up to date on the latest gear, sales, and news from Agena!*