



How to Make A Solar Filter for Viewing A Solar Eclipse
Observing and photographing the Sun is one of the most rewarding parts of amateur astronomy! In this article, we’ll cover how to make a solar filter for your telescope, camera lens or binoculars. With your own solar filter, you can safely observe and photograph a solar eclipse like the 2023 annular solar eclipse, 2024 total solar eclipse, partial eclipses, or the Sun on any day.
Warning: Never look at the Sun without proper filtration. Serious eye damage or blindness will occur.

Materials You’ll Need
- Solar film (see more on how much you’ll need in Step 1 below)
- A cardboard poster tube or poster board (see Step 2 for which size)
- Flat cardboard or foam core
- X-acto knife or bread knife
- Adhesive felt strips
- Double sided tape
- Scissors to cut solar filter material
- Glue
How to Make a Solar Filter: Step by Step Guide
Step 1: Choosing your Solar Film
Before you make your telescope solar filter, it’s important to figure out what size solar film to buy. Solar film is sold in square or rectangular sheets, so you’ll need to measure what size you need. Start by measuring the outer diameter (OD) of the dew shield of your telescope or binoculars. Write this number down, as you’ll need it later! It’s a good idea to take this number and size up a couple of inches, so if your telescope dew shield has a 4” (101mm) outer diameter, we recommend getting at least a 6” (152mm) square of solar film or larger.
One of the highest quality products for making your own filter is Baader Planetarium’s foil material called AstroSolar. You can find AstroSolar film here in various size sheets from as small as 5.5” (140mm) to as large as 39.4” (1 meter) on one side. Thousand Oaks Optical also makes a quality solar filter material called SolarLite. SolarLite solar film is available at Agena Astro here in various size square sheets from as small as 3” (76mm) to as large as 18” (457mm).
If you’re using a camera lens, measure the outer diameter of your lens hood. Please note, there are already many great pre-made thread-on solar filters for camera lenses if you prefer an easier solution.
Step 2: Making the Cylinder
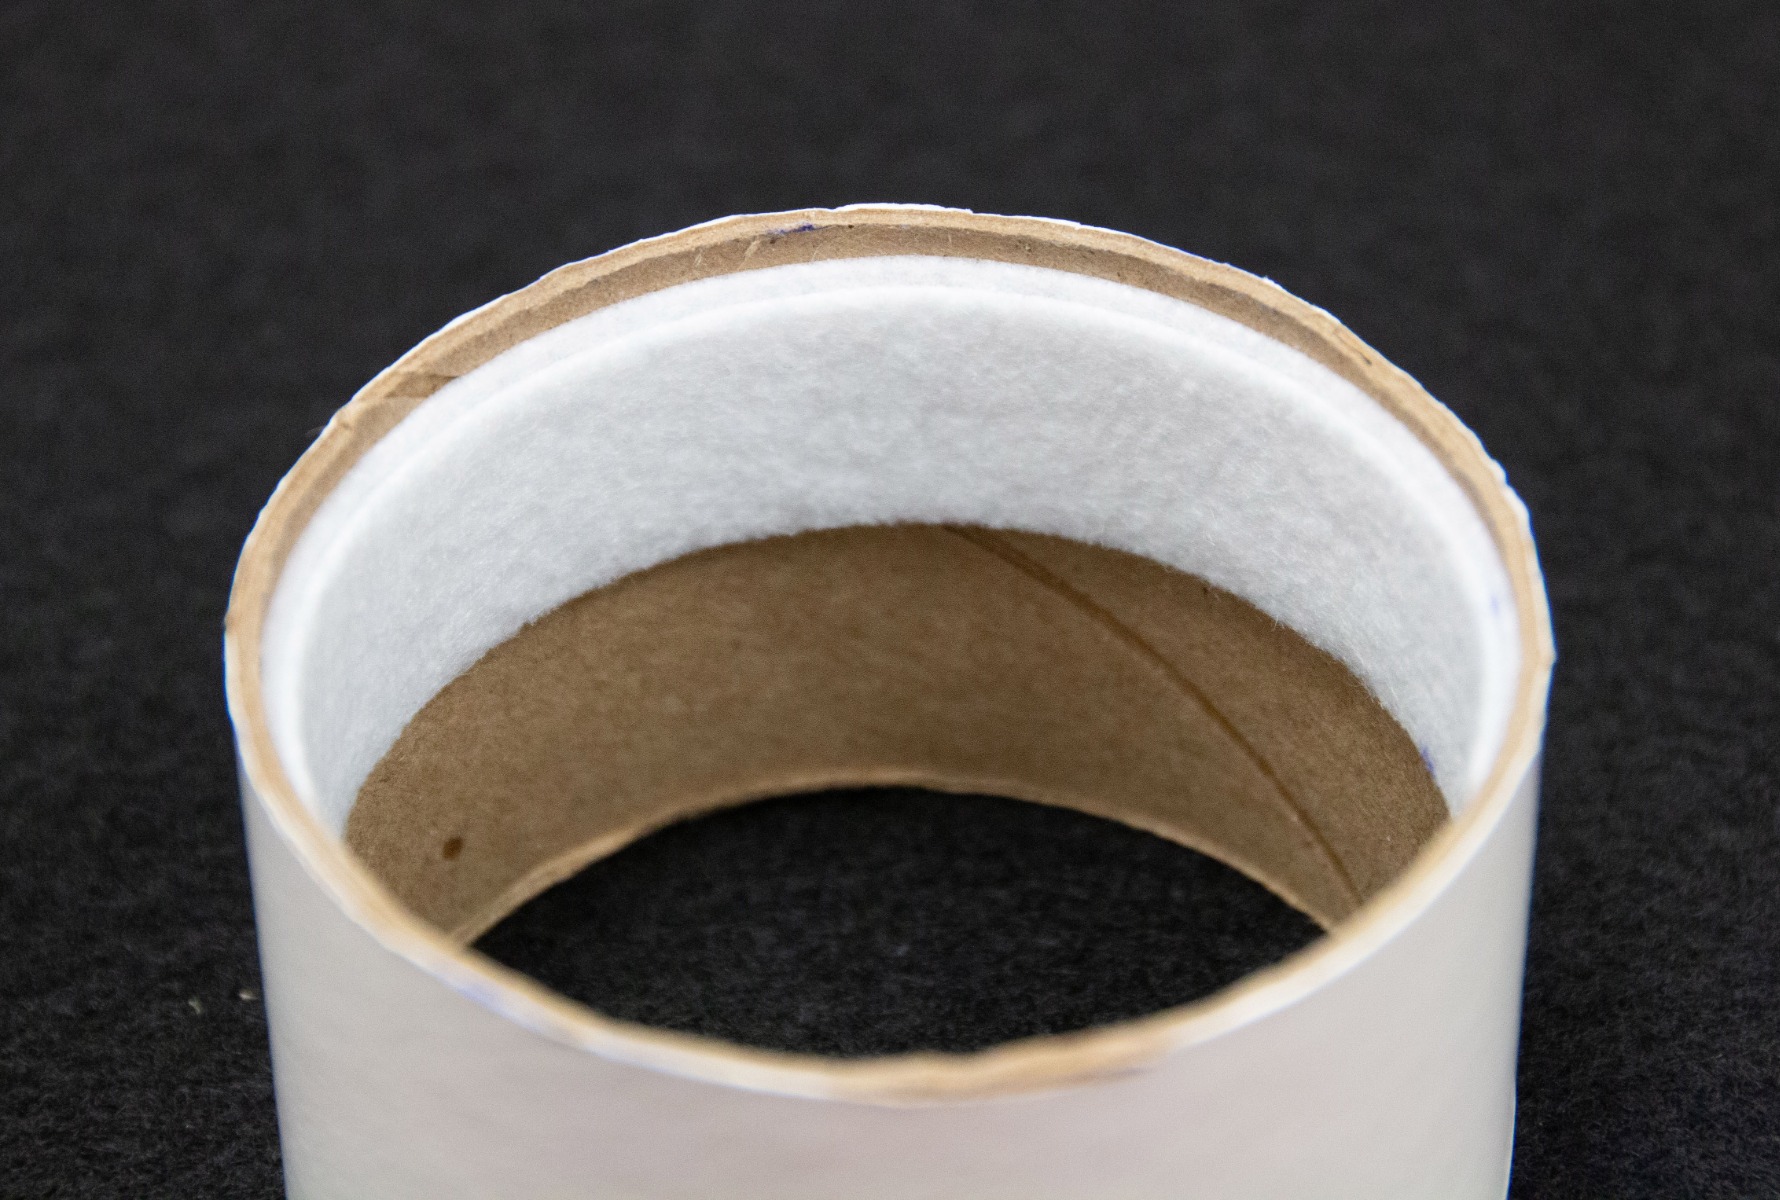
In order to start making a solar filter for your telescope, camera lens, or binoculars, we need to make a cylinder that will fit around the dew shield or lens hood. This cylinder will hold the solar film in place and fit snugly around your optics.
For camera lenses, binoculars, and smaller telescopes up to 6” (152mm) in diameter, a cardboard poster shipping tube will work well. These can be found at most office or art supply stores. You’ll want to find a tube equal or larger to the outer diameter number you measured in Step 1. Once you have the correct size tube, measure in 2 inches (51mm) from one end and mark it with a line. Then, use a bread knife or X-acto knife to cut off this 2-inch section to create your housing. It should fit snugly on the telescope yet slide easily on and off. If it is too loose, you can use self-adhesive felt strips around the inside diameter of the tube to create the exact fit.
Step 3: Creating the Filter Cell

Now that we have the completed cylinder, we need to create the cell that will hold the solar filter material in place. We can use any type of sturdy cardboard material for this application. As long as it holds its shape and doesn’t flex, unlike a thinner poster board material.
Start by cutting out two rings or squares of cardboard or foam core where the outer diameter (OD) or width is roughly 3/4” (19mm) greater than the cylinder’s outer diameter. The inner diameter (ID) of the cardboard should be cut so it is several millimeters wider than the aperture of your telescope or lens. Once we have two completed rings or squares, attach several pieces of double-sided tape around the outside edges.
Step 4: Attaching the Solar Film to the Filter Cell

In this next step, we will use a sheet of soft tissue paper material. Place the tissue on a clean flat table. Now tape the tissue onto the table. Next, we will take a sheet of the filter material that is slightly bigger than the OD-sized cardboard ring or width of the square. Do not tape the film and do not stretch it. It should just rest relaxed on top of the tissue.
Then, take the cardboard ring or square that has the sticky tape on it and place it face down while lowering it gently onto the solar filter material until the entire ring has made contact. You can now turn over this assembly and lie it flat on the table. Take the other taped ring or square you created earlier and gently place it on top of the solar material to sandwich the film. Once together, the solar film should look slightly wrinkled and not stretched tight. This is correct. Be sure to trim away any extra material around the edges. Your mounted filter is now ready to be attached to the cell.
Step 5: Glue the Filter Cell to the Cylinder

The final step is to now glue this filter assembly onto your cylinder. Be sure to properly align the filter cell with the cylinder so the aperture is not obstructed. You can use any type of glue you’d like as long as it is given enough time to properly dry and cure before any solar viewing is attempted. You do not want it to come apart during a viewing or photo session. This is especially true during the precious few minutes during a solar eclipse.
One last suggestion for your new solar filter is to paint the Sun facing side of the cell’s trim white. This will help reduce heat build up within the assembly itself as well as the objective lens. Reducing heat induced currents will make for a sharper view.
You have now completed your very own solar filter, congratulations! It should look something like this:

Solar Filters for Large Aperture Telescopes
For larger aperture scopes over 6” (152mm), you do not necessarily have to use a full aperture filter. This is a case where less is more. The larger the aperture the more the image will be affected by air turbulence. This can blur smaller details on the surface of the Sun such as granulation and the fine filamentary structure found in the penumbra of sunspots.
If you have a larger telescope, we recommend an off-axis filter. Producing an off axis filter is much the same as full aperture. A good rule of thumb is to make the off-axis aperture slightly smaller than half of the main instrument. Doing so enables the filter opening to avoid the secondary mirror spider found in Newtonian, Cassegrain and Ritchey Chretien designs as well as the secondary mirror holder found in popular Schmidt-Cassegrains. Off-axis filters are also much more affordable to make.
How to Store Your Solar Filter
Now that you have your filter, you’ll need to keep it in a safe place so it won’t get damaged. There are several solutions available. One of the easiest is to find a plastic food storage container. The size of the container should allow your filter to sit inside without being bent or warped. This type container will also seal out dust during storage. If you live in a humid environment, I would also suggest putting in a small desiccant pack inside the container while storing. This will help prevent any moisture buildup and prolong the life of the filter.
How to Clean Your Solar Filter
It is always best to try and minimize, or even avoid, cleaning your solar filter. It takes a lot of dust or buildup of contaminants to effect the image quality of most optical filters. If cleaning must be done, it is recommended that dust first be blown off with an air-blower bulb or a can of compressed air. If further cleaning is required, lint free tissue paper and 91% isopropyl alcohol is best. Gently mist the filter material with alcohol until it is wet. You don’t want it dripping wet. Just enough to loosen the dust and grime. Next, take a clean piece of damp tissue paper and gently drag it across the filter. Light finger pressure is all you need. Do not press too hard. Use once and dispose. Take another clean tissue to continue the above process until all contaminants have been removed. Allow to air dry.
Safety Considerations
Both the Baader AstroSolar and Thousand Oaks SolarLite material will give you years of viewing enjoyment if you take care of it. Please note that if the material becomes damaged in any way, it must be discarded immediately. Should the material develop large holes or cuts, an increase in damaging bright UV light could reach your eyes. This would cause instant damage to your vision.
Always install a solar filter over the front of the telescope or lens. Never place a solar filter into the eyepiece. Doing so can cause a dangerous amount of heat to build up that will eventually cause the filter to fail.
How to Make A Solar Filter for Viewing A Solar Eclipse
Observing and photographing the Sun is one of the most rewarding parts of amateur astronomy! In this article, we’ll cover how to make a solar filter for your telescope, camera lens or binoculars. With your own solar filter, you can safely observe and photograph a solar eclipse like the 2023 annular solar eclipse, 2024 total solar eclipse, partial eclipses, or the Sun on any day.
Warning: Never look at the Sun without proper filtration. Serious eye damage or blindness will occur.
Materials You’ll Need
- Solar film (see more on how much you’ll need in Step 1 below)
- A cardboard poster tube or poster board (see Step 2 for which size)
- Flat cardboard or foam core
- X-acto knife or bread knife
- Adhesive felt strips
- Double sided tape
- Scissors to cut solar filter material
- Glue
How to Make a Solar Filter: Step by Step Guide
Step 1: Choosing your Solar Film
Before you make your telescope solar filter, it’s important to figure out what size solar film to buy. Solar film is sold in square or rectangular sheets, so you’ll need to measure what size you need. Start by measuring the outer diameter (OD) of the dew shield of your telescope or binoculars. Write this number down, as you’ll need it later! It’s a good idea to take this number and size up a couple of inches, so if your telescope dew shield has a 4” (101mm) outer diameter, we recommend getting at least a 6” (152mm) square of solar film or larger. If you need further instructions on how to figure out the outer diameter, you can follow the steps to measure it in our How to Choose A Solar Filter guide.
One of the highest quality products for making your own filter is Baader Planetarium’s foil material called AstroSolar. You can find AstroSolar film here in various size sheets from as small as 5.5” (140mm) to as large as 39.4” (1 meter) on one side. Thousand Oaks Optical also makes a quality solar filter material called SolarLite. SolarLite solar film is available at Agena Astro here in various size square sheets from as small as 3” (76mm) to as large as 18” (457mm).
If you’re using a camera lens, measure the outer diameter of your lens hood. There are already many great pre-made thread-on solar filters for camera lenses if you prefer an easier solution, but these are made of glass and solar film tends to give higher resolution images.
Step 2: Making the Cylinder
In order to start making a solar filter for your telescope, camera lens, or binoculars, we need to make a cylinder that will fit around the dew shield or lens hood. This cylinder will hold the solar film in place and fit snugly around your optics.
For camera lenses, binoculars, and smaller telescopes up to 6” (152mm) in diameter, a cardboard poster shipping tube will work well. These can be found at most office or art supply stores. You’ll want to find a tube equal or larger to the outer diameter number you measured in Step 1. Once you have the correct size tube, measure in 2 inches (51mm) from one end and mark it with a line. Then, use a bread knife or X-acto knife to cut off this 2-inch section to create your housing. It should fit snugly on the telescope yet slide easily on and off. If it is too loose, you can use self-adhesive felt strips around the inside diameter of the tube to create the exact fit.
Step 3: Creating the Filter Cell
Now that we have the completed cylinder, we need to create the cell that will hold the solar filter material in place. We can use any type of sturdy cardboard material for this application. As long as it holds its shape and doesn’t flex, unlike a thinner poster board material.
Start by cutting out two rings or squares of cardboard or foam core where the outer diameter (OD) or width is roughly 3/4” (19mm) greater than the cylinder’s outer diameter. The inner diameter (ID) of the cardboard should be cut so it is several millimeters wider than the aperture of your telescope or lens. Once we have two completed rings or squares, attach several pieces of double-sided tape around the outside edges.
Step 4: Attaching the Solar Film to the Filter Cell
In this next step, we will use a sheet of soft tissue paper material. Place the tissue on a clean flat table. Now tape the tissue onto the table. Next, we will take a sheet of the filter material that is slightly bigger than the OD-sized cardboard ring or width of the square. Do not tape the film and do not stretch it. It should just rest relaxed on top of the tissue.
Then, take the cardboard ring or square that has the sticky tape on it and place it face down while lowering it gently onto the solar filter material until the entire ring has made contact. You can now turn over this assembly and lie it flat on the table. Take the other taped ring or square you created earlier and gently place it on top of the solar material to sandwich the film. Once together, the solar film should look slightly wrinkled and not stretched tight. This is correct. Be sure to trim away any extra material around the edges. Your mounted filter is now ready to be attached to the cell.
Step 5: Glue the Filter Cell to the Cylinder
The final step is to now glue this filter assembly onto your cylinder. Be sure to properly align the filter cell with the cylinder so the aperture is not obstructed. You can use any type of glue you’d like as long as it is given enough time to properly dry and cure before any solar viewing is attempted. You do not want it to come apart during a viewing or photo session. This is especially true during the precious few minutes during a solar eclipse.
One last suggestion for your new solar filter is to paint the Sun facing side of the cell’s trim white. This will help reduce heat build up within the assembly itself as well as the objective lens. Reducing heat induced currents will make for a sharper view.
You have now completed your very own solar filter, congratulations! It should look something like this:
Solar Filters for Large Aperture Telescopes
For larger aperture scopes over 6” (152mm), you do not necessarily have to use a full aperture filter. This is a case where less is more. The larger the aperture the more the image will be affected by air turbulence. This can blur smaller details on the surface of the Sun such as granulation and the fine filamentary structure found in the penumbra of sunspots.
If you have a larger telescope, we recommend an off-axis filter. Producing an off axis filter is much the same as full aperture. A good rule of thumb is to make the off-axis aperture slightly smaller than half of the main instrument. Doing so enables the filter opening to avoid the secondary mirror spider found in Newtonian, Cassegrain and Ritchey Chretien designs as well as the secondary mirror holder found in popular Schmidt-Cassegrains. Off-axis filters are also much more affordable to make.
How to Store Your Solar Filter
Now that you have your filter, you’ll need to keep it in a safe place so it won’t get damaged. There are several solutions available. One of the easiest is to find a plastic food storage container. The size of the container should allow your filter to sit inside without being bent or warped. This type container will also seal out dust during storage. If you live in a humid environment, I would also suggest putting in a small desiccant pack inside the container while storing. This will help prevent any moisture buildup and prolong the life of the filter.
How to Clean Your Solar Filter
It is always best to try and minimize, or even avoid, cleaning your solar filter. It takes a lot of dust or buildup of contaminants to effect the image quality of most optical filters. If cleaning must be done, it is recommended that dust first be blown off with an air-blower bulb or a can of compressed air. If further cleaning is required, lint free tissue paper and 91% isopropyl alcohol is best. Gently mist the filter material with alcohol until it is wet. You don’t want it dripping wet. Just enough to loosen the dust and grime. Next, take a clean piece of damp tissue paper and gently drag it across the filter. Light finger pressure is all you need. Do not press too hard. Use once and dispose. Take another clean tissue to continue the above process until all contaminants have been removed. Allow to air dry.
Safety Considerations
Both the Baader AstroSolar and Thousand Oaks SolarLite material will give you years of viewing enjoyment if you take care of it. Please note that if the material becomes damaged in any way, it must be discarded immediately. Should the material develop large holes or cuts, an increase in damaging bright UV light could reach your eyes. This would cause instant damage to your vision.
Always install a solar filter over the front of the telescope or lens. Never place a solar filter into the eyepiece. Doing so can cause a dangerous amount of heat to build up that will eventually cause the filter to fail.